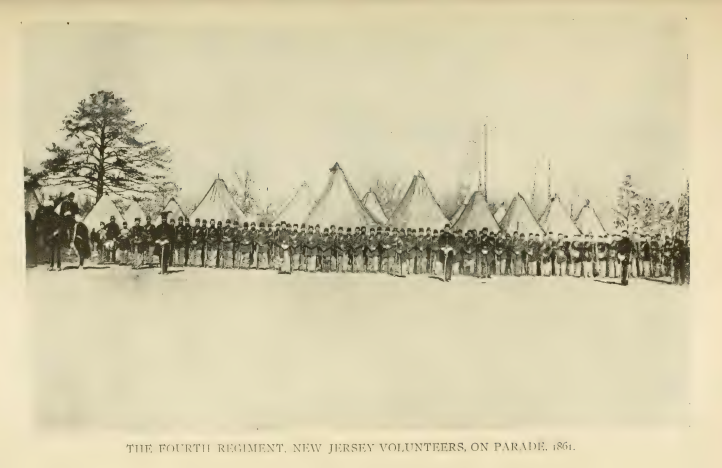
“We Marched, Fought, and Endured”: The 4th New Jersey Infantry in the Overland Campaign and Petersburg
The Research Arsenal is proud to be digitizing and adding historical records of Civil War regiments held at the National Archives to our online database so that researchers and historians can access material that previously required a trip to Washington D.C. The 4th New Jersey Infantry is one of the many regiments that has been added to our database.
By 1864, the men of the 4th New Jersey Infantry were no longer new soldiers. They were veterans—hardened by years of campaigning and now entering what would become the most brutal phase of the war.
The Wilderness: Into the Thicket of Fire
As the Army of the Potomac advanced in May 1864, the First New Jersey Brigade moved into the tangled, suffocating terrain of the Wilderness. Baquet describes the confusion and violence of the fighting:
“The brigade was soon hotly engaged, the enemy being encountered in force in the dense woods. The line advanced steadily, delivering its fire with coolness and precision, though the undergrowth was so thick as to render the alignment irregular and the movements difficult. The fire of the enemy was severe, and the men were subjected to a galling musketry which told heavily upon the ranks.” (Baquet, p. 452)
In this environment, visibility was limited, formations broke apart, and the fighting became intensely personal.
Capern’s letters reflect the same strain and anticipation that defined these early days of the campaign:
“We could hear the fierce rattle of the musketry, and the booming of the cannon, and we could see the shells bursting in the air above the trees. It was a grand but terrible sight, one that I shall never forget. We stood looking on for some time, watching the smoke rise and hearing the continual roar, and wondering how long it would be before we should be called into the fight.”
The Wilderness was not just a battle—it was chaos, noise, and suffocating fear.
Continuous Movement: No Rest for the Army
One of the defining features of Grant’s campaign was constant movement. Baquet emphasizes how little rest the men received as they pushed forward:
“The march was resumed with but little delay, the troops moving by night as well as by day, and halting only for brief intervals. The men were greatly fatigued, but there was no straggling; all seemed impressed with the importance of the movement and the necessity of pressing forward.” (Baquet, p. 456)
Capern’s account mirrors this exhaustion almost word for word:
“We kept on the march till daylight, and then lay down for a little rest. I was so tired that I believe I marched a good piece with my eyes shut. We have been two days without anything to eat, and feel it very much. Still, we have to keep along, for there is no stopping.”
Here, the official history and the soldier’s voice align perfectly—discipline and endurance carrying the men forward despite extreme fatigue.
Spotsylvania: Holding Under Fire
At Spotsylvania Court House, the fighting became even more intense. Baquet describes the brigade under heavy and sustained fire:
“The position occupied by the brigade was one of great exposure, and the fire to which it was subjected was exceedingly severe. Notwithstanding this, the men held their ground with great firmness, returning the fire with spirit and effect, and maintaining their line under circumstances of the utmost trial.” (Baquet, p. 468)
This was no brief engagement. The fighting dragged on, testing both physical and mental endurance.
Capern captured the cumulative toll of this kind of sustained combat:
“We are all sore after eleven days fighting and marching, and nearly worn out. We have had a most mighty hard time, and how much longer it will continue God only knows. The men are in good spirits, however, and determined to go through with it.”
The phrase “most mighty hard time” feels almost understated in light of the conditions they endured.
Hunger, Exposure, and Survival
As the campaign wore on, logistical strain added to the hardship. Baquet notes the increasing difficulty of maintaining the army in the field:
“The men suffered considerably for want of proper rations, the rapid movements of the army rendering it difficult for the supply trains to keep up. Notwithstanding these privations, the command continued in good condition, and was ready for duty whenever called upon.” (Baquet, p. 472)
Capern’s firsthand account reveals just how severe those privations could become:
“All I had to eat was a little dust and dirt out of the bottom of my haversack. I was so hungry that I ate it and thought it good. We have suffered a great deal for something to eat, and it tries a man very much.”
This is the lived reality behind Baquet’s more measured description.
Petersburg: Life in the Trenches
When the campaign settled into siege at Petersburg, the nature of the war changed—but the hardship did not lessen. Baquet describes the transition to trench warfare:
“The brigade was now engaged in the duties incident to a siege, occupying the lines before Petersburg, and constantly exposed to the fire of the enemy’s sharpshooters and artillery. The men were required to be continually on the alert, and the labor of strengthening and maintaining the works was unceasing.” (Baquet, p. 489)
This was a new kind of warfare—static, grinding, and relentless.
Capern’s earlier reflections on fatigue and exposure take on new meaning in this context:
“We do not get much rest, and when night comes we are glad enough to lie down, no matter where it is… It hurts a man to sleep out on the bare, frozen ground these frosty nights. We have but little to cover us, and the cold is very severe.”
Even without constant charges, the siege demanded endurance of a different kind—long-term survival under fire.
Preparing for Death
Whether in open battle or entrenched lines, the awareness of mortality never left the soldiers. Capern described preparing for combat in deeply personal terms:
“We piled up our knapsacks and everything we did not want to carry into the fight, never expecting to see them again. I felt that I might be called upon to die, and I tried to prepare myself for it. I put my trust in God and felt that whatever might happen would be for the best.”
This quiet moment—shared by countless soldiers—speaks more powerfully than any battle report.
Reflection: “Thankful… to Have Got Off with My Life”
By the end of these campaigns, survival itself was a kind of victory. Capern reflected:
“After seeing what I have seen, I am thankful to God for having got off with my life. Many a poor fellow has fallen who went out as strong and hopeful as I. It makes a man feel very serious when he thinks of these things.”
Baquet’s history records movements, engagements, and outcomes. Capern records something else entirely—the emotional cost.
Conclusion: The Veteran’s War
The pages of Baquet (451–504) show a regiment constantly in motion—fighting, marching, digging, and holding under pressure. Capern’s letters show what that experience felt like. Together, they reveal the true nature of the 4th New Jersey Infantry in 1864–1865: not just a fighting unit, but a body of men who endured hunger, exhaustion, fear, and loss—and continued forward anyway.
Sources
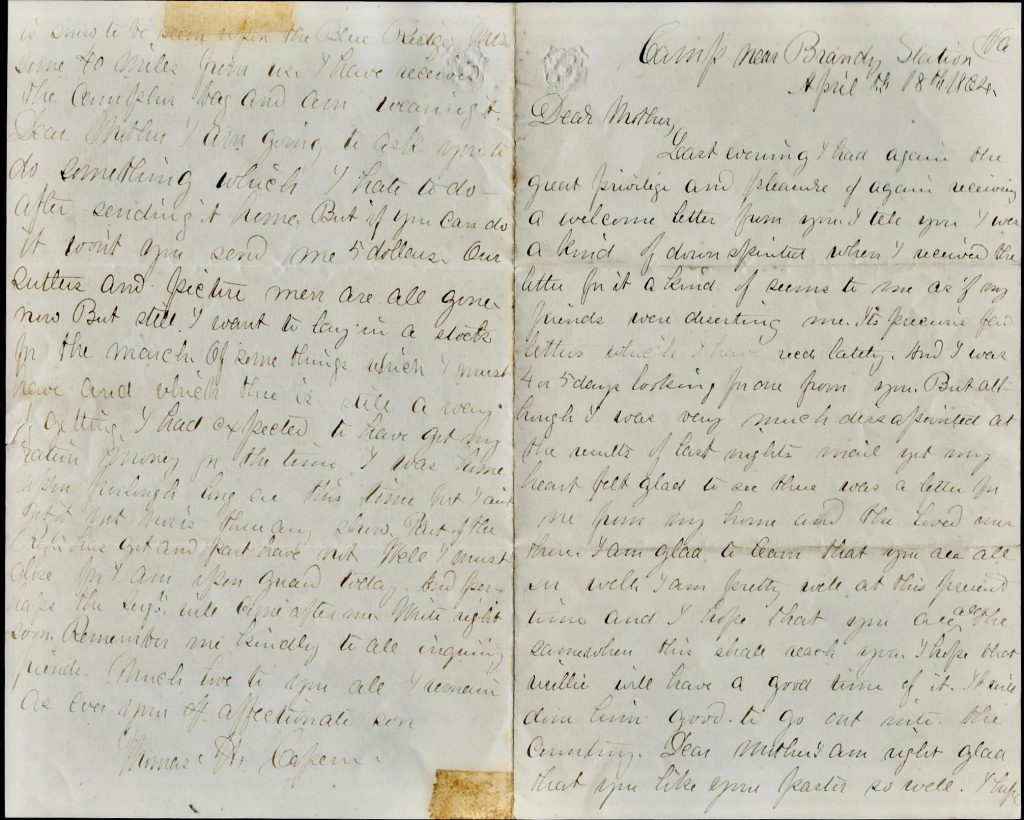
The Research Arsenal is proud to hold digital scans of the 4th New Jersey’s regimental records on its database. These consist of over 1,100 pages of material from the National Archives Records Group 94 files. These include Regimental Descriptive books, Order books, Morning Reports, and more. Visit the Research Arsenal, click on “Search NARA Records” then select “RG94” and “4th New Jersey Infantry” from the drop-down menus. In addition, the Research Arsenal contains photographs, letters, and other forms and documents relating to the 4th New Jersey Infantry. Thomas Capern’s letters featured in this post are also available on the Research Arsenal.
- Baquet, Camille. History of the First Brigade, New Jersey Volunteers (First Brigade), from 1861 to 1865, pp. 451–504 (PDF page numbers).
https://ia800702.us.archive.org/35/items/historyoffirstbr00baqu/historyoffirstbr00baqu.pdf - “Letters of Thomas H. Capern, Co. E, 4th New Jersey Infantry.” Research Arsenal. Letter Library, filter by “Individual” and search “Thomas Capern”
https://app.researcharsenal.com/library - “4th New Jersey Infantry Regiment.” Wikipedia.
https://en.wikipedia.org/wiki/4th_New_Jersey_Infantry_Regiment